Setting up the Federation using OAM PS2
With the release of OAM PS2, you could not setup OAM as Identity Provider as well. Until PS1 release, OAM could be used as Service Provider only.
This post cover the basic setting to get started with federation setup. There are two distinct setup,
1. Service Provider setup.
2. Identity Provider setup
1. Setup the Service Provider (SP)
1> Enable the Federation:
After logging in, you will be sent to the dashboard page, at the bottom of the page click on "Available Service"

On the page that is displayed next, click on "Enable" in front of "Identity Federation". This will enable the federation services.

3> Export the metadata:
The IdP will require to create a relationship for SP. They will need the metadata from SP to do that. Export the metadata that could be consumed by IdP.
1. On the dashboard, click on Federation Settings.

2. The following page will be displayed. On this page, click on the button with "Export SAML2.0 Metadata" to export the metadata. You will be asked to save the file.

3. Send this file over to the Identity Provider
Before coming to the next step, make sure that you have the metadata file form IdP.
4> Create new Identity Provider
1> On the dashboard --> click "Service Provider Administration"

2> Click on "Create Identity Provider Partner"
This is where you will need to import the metadata from the IdP partner.

3> Click on "Create Authentication and Federation Plugin". This will create the needed authentication plugin and authentication scheme. Note the name of plugin and scheme generated.

5> Create the OAM Policy to protect the resources
Under suitable domain, create a new Authentication Policy. When creating the policy use the Authentication scheme that was generated in the step 4 by clicking on "Create Authentication and Federation Plugin".

6> Create the resources to be protected
Go back to the domain and create all the resources that you want to be protected.


3> Click on "Create Authentication and Federation Plugin". This will create the needed authentication plugin and authentication scheme. Note the name of plugin and scheme generated.

5> Create the OAM Policy to protect the resources
Under suitable domain, create a new Authentication Policy. When creating the policy use the Authentication scheme that was generated in the step 4 by clicking on "Create Authentication and Federation Plugin".
6> Create the resources to be protected
Go back to the domain and create all the resources that you want to be protected.

2. Setup the Identity Provider
1> Export the metadata
As the first step, generate the metadata, send it to the service provider.

2> Create the Attribute Profile
The profile you create will include the attributes that will be sent with SAML assertion, either on demand from SP or as a mandatory attributes to be sent.
1> From the dashboard, click in Identity Provider Administration à Service Provider Attribute Profile

2> Click on New button

3> Create a new profile with the attribute to be transported, a sample is shown below.

1> From the dashboard, click in Identity Provider Administration à Service Provider Attribute Profile

2> Click on New button

3> Create a new profile with the attribute to be transported, a sample is shown below.

4> Create Service Provider Partner
1> Click on the button "Create Service Provider Partner"

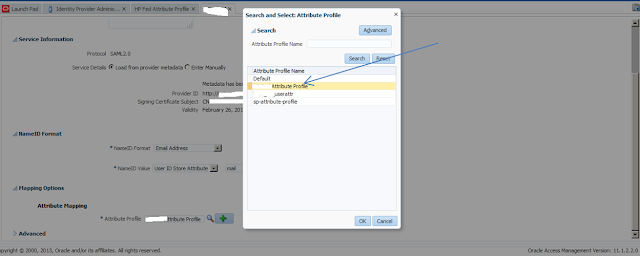
2> This is where you will import the metadata provided by SP. A sample is shown below

1> Click on the button "Create Service Provider Partner"
2> This is where you will import the metadata provided by SP. A sample is shown below

3> Select the attribute profile by clicking on the button next to Attribute profile, select the profile you created earlier.

Click on apply, Test
Have fun ...
Have fun ...