Wednesday, November 4, 2015

OAM Throwing error - java.lang.SecurityException: MBean operation access denied. MBean: oracle.oam:type=PATConfig Operation: listPartners(java.lang.String) Detail: Access denied. Required roles: Admin, Operator, executing subject: principals=[oamadmin, ….]

This continues to be problem with OAM PS2 version. When you try to search for "Identity Provider Partners" or "Service Providers partners". The following error is thrown:

java.lang.SecurityException: MBean operation access denied. MBean: oracle.oam:type=PATConfig Operation: listPartners(java.lang.String) Detail: Access denied. Required roles: Admin, Operator, executing subject: principals=[oamadmin, ….]
Error
MBean operation access denied. MBean: oracle.oam:type=PATConfig Operation: listPartners(java.lang.String) Detail: Access denied. Required roles: Admin, Operator, executing subject: principals=[oamadmin, ….]
Error

Access denied. Required roles: Admin, Operator, executing subject: principals=[oamadmin, ….]

To fix this problem, you will need to add the group that “oamadmin” ( or the user you are using to login to OAM) to the weblogic role for administrators.

To do this:
1.       Open the weblogic console:
2.       Click on the “Security Realms” à myrealm à “Roles and Policies” tab
3.       Expand “Global Roles”
4.       Expand “Roles, the following page will be displayed


1.       Click on “View Role Conditions ( or Add Role Condition) for “Admin” role.
2.       Click on “Add Conditions”.


1.       Click Next
. Select “Group à Click “Next”.
. Add the group “OAMAdministrators” (Case Sensitive) and finish.


 10. Save the changes.
11. Access the same link again. it will work.

Have Fun ......


Tuesday, May 5, 2015

Setting up the Federation using OAM PS2


Setting up the Federation using OAM PS2


With the release of OAM PS2, you could not setup OAM as Identity Provider as well. Until PS1 release, OAM could be used as Service Provider only. 

This post cover the basic setting to get started with federation setup. There are two distinct setup,

1. Service Provider setup.
2. Identity Provider setup


1. Setup the Service Provider (SP)

1> Enable the Federation: 
After logging in, you will be sent to the dashboard page, at the bottom of the page click on "Available Service"


2> Enable Federation: 
On the page that is displayed next, click on "Enable" in front of "Identity Federation". This will enable the federation services.


3> Export the metadata: 
The IdP will require to create a relationship for SP. They will need the metadata from SP to do that. Export the metadata that could be consumed by IdP.

    1. On the dashboard, click on Federation Settings.


    2. The following page will be displayed. On this page, click on the button with "Export SAML2.0     Metadata" to export the metadata. You will be asked to save the file.


   3. Send this file over to the Identity Provider


Before coming to the next step, make sure that you have the metadata file form IdP.

4> Create new Identity Provider


1> On the dashboard --> click "Service Provider Administration"


2> Click on "Create Identity Provider Partner"

This is where you will need to import the metadata from the IdP partner.


3> Click on "Create Authentication and Federation Plugin". This will create the needed authentication plugin and authentication scheme. Note the name of plugin and scheme generated.


5> Create the OAM Policy to protect the resources

Under suitable domain, create a new Authentication Policy. When creating the policy use the Authentication scheme that was generated in the step 4 by clicking on "Create Authentication and Federation Plugin".


6> Create the resources to be protected
Go back to the domain and create all the resources that you want to be protected.


2. Setup the Identity Provider


1> Export the metadata
As the first step, generate the metadata, send it to the service provider.


2> Create the Attribute Profile
The profile you create will include the attributes that will be sent with SAML assertion, either on demand from SP or as a mandatory attributes to be sent.

1> From the dashboard, click in Identity Provider Administration à Service Provider Attribute Profile


2> Click on New button


3> Create a new profile with the attribute to be transported, a sample is shown below.  


4> Create Service Provider Partner

1> Click on the button "Create Service Provider Partner"


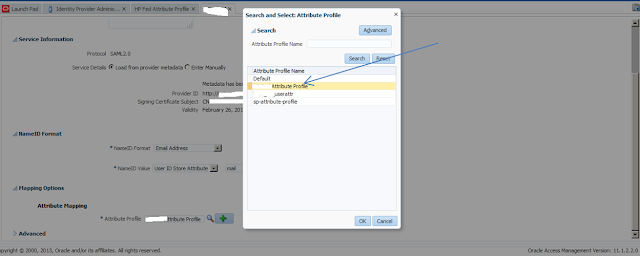
2> This is where you will import the metadata provided by SP. A sample is shown below


3> Select the attribute profile by clicking on the button next to Attribute profile, select the profile you created earlier.


Click on apply, Test

Have fun ...


Wednesday, April 29, 2015

OAM Error, MBean operation access denied. MBean: oracle.oam:type=Config Operation: retrieveMapPropertyArray(java.lang.String) Detail: Access denied. Required roles: Admin, executing subject: principals=[eidmwebadmin, OAMAdministrators, OAMSystemAdminGroup]


Error: java.lang.SecurityException: MBean operation access denied. MBean: oracle.oam:type=Config Operation: retrieveMapPropertyArray(java.lang.String) Detail: Access denied. Required roles: Admin, executing subject: principals=[eidmwebadmin, OAMAdministrators, OAMSystemAdminGroup]

This error comes because you choose to create an Admin group for OAM administration and named it something other than Administrators. The group has to be included in the WebLogic Roles and Policies to be allowed to have admin privileges to all MBEANS.

1>     Login to Weblogic à Click on “Security Realm”


2>     Click on myrealm


3>     Select “Roles and Policies”, expand Global Roles à Roles


4>     Select “Vie Role Conditions” for “Admin Roles.
The following screen shows an already added group “OAMAdministrators”. But you will need to select Add Conditions à Group à Provide Group Name in “Group Argument Name” à Finish


5>     Save. Restart the OAM Domain.

Have Fun....


Friday, March 13, 2015

Create an OVD changelog adapter

Create an OVD changelog adapter


Changelog is needed for many application such as OIM that use the changelog to keep data between OIM and OID in sunc. To create a changelog adapter,

1>     Make sure that change log.
To confirm, run
ldapsearch –D orcladmin –w <password> -h <server> -p <port> -b ‘’ –s base objectclass=* lastchangenumber

2>     Login to ODSM, http://<server>:<port>/odsm
3>     Connect to the OVD using ODSM.
4>     Click on the Tab “Adapter”.
5>     Create a new adapter.
This will start the wizard. Create adapter using the following parameters.

Type
Adapter Type
LDAP

Adapter Name
Changelog Adapter

Adapter Template
Changelog_OID
Connection
Use DNS for Auto Discovery
No

Host
<oid server>

Port
<oid port>

Server Proxy Bind DN
cn=orcladmin

Proxy Password
Password for orcladmin user.
Connection Test

Validate that the test succeeds.
Namespace
Remote Base
(Do not assign.)

Mapped Namespace
cn=changelog
Summary

Verify that the summary is correct, then click Finish.


Have fun ...


Enable/Disable the OID changelog

Enable/Disable the OID changelog


OID uses the changelog to keep track of the changes performed. It is used by application such as OIM to keep the OIM and OID in sync. By default, when you install OID, changelog is enabled. For some reason, if it not enabled, you could enable it using quickly using the procedure below.
Set the value for the attribute orclgeneratechangelog to enable or disable the change log. Create a LDIF file to set the value for above property

dn: cn=componentname,cn=osdldapd,cn=subconfigsubentry
changetype: modify
replace: orclgeneratechangelog
orclgeneratechangelog: 1

A value of “1” will enable the changelog whereas, “0” will disable it.
Modify by running

Ldapmodify –D cn=orcladmin –w <password> -h  <oid Server> -p <oid port> -f <ldif file name>

Viewing the Changelog


Use ldapsearch to view the changelogs.
Use different filters to view the log, for example:
1.    For example, to view a range of change logs that have been transported from the supplier to the local node, use filter:
   "(&(objectclass=changeLogEntry)(servername=SUPPLIER_REPLICAID)\
   (changeNumber>=FROMCHGNO)(changeNumber<=TOCHGNO))"
2.    To view a single change log that has been transported from the supplier to the local node, use:
   "(&(objectclass=changeLogEntry)(servername=SUPPLIER_REPLICAID)\
   (changeNumber=CHGNO))" 
3.    To view a range change logs that have been generated at the local node, use:
"(&(objectclass=changeLogEntry)(changeNumber>=FROMCHGNO)(changeNumber<=TOCHGNO))"
4.    To view a single change log that has been generated at the local node, use:
   "(&(objectclass=changeLogEntry)(changeNumber=CHGNO))" 


Have fun...


Tuesday, February 24, 2015

Roll back/Revert a published Sandbox in OIM 11GR2

Reverting a Published Sandbox in OIM 11g R2

So many times, you would like to roll back the changes made by a published sandbox. Once published, there is no option available in OIM admin or identity interface to roll back the published sandbox. However, starting 11GR2, you could roll back the published sandbox through Enterprises Manager interface.


1. Login to Enterprise Manager(EM Console).


2> Enter into MDS schema by clicking “Identity and Access” à OIM à oim(11.1.2…..)


3> Start MBean Browser


4> Goto oracle.mds.lcm à Server: oim_server1 à Application: oracle.iam.console.identity.self-service.ear à MDSAppRuntime à MDSAppRuntime


5> On the right side, click the “listMetadataLabels”. There are 2 of them, choose the one that does not require parameter.


6> For each sandbox there will be 3 entrees, creation_<sandbox>…., pre_<sandbox>…., and post_<sandbox>…. . To go back to the oim status before the sandbox was created ( roll back the sandbox), copy the name of the SB starting with creation…..example Creation_OIM_testbox_10:30:00 . Copy the name

7> Click on “Return” to go to previous page (Operations).

Find the operation “promoteMetadataLabel”. There are 2 of them, use the one that takes one parameter only.


8> Paste the sandbax name you copied (Creation_OIM_testbox_10:30:00).

9> Click “Invoke.

10> Restart the OIM

Have fun....


Wednesday, February 18, 2015

Offloading webgate SSL to a load balancer

Offloading webgate SSL to a load balancer


A very common configuration for webservers is to proxy it behind a load balancer. More often than not, the ssl terminates at load balancer. This means that from load balancer to web server, traffic is in OPEN TEXT mode. This allows organization to be able use IDS/IPS to monitor the internal traffic.


The webgate is installed on web server, when webgate receives the traffic, it sees it in OPEN TEXT mode. So, it sends back the respond to forward to the next url in OPEN mode (http://<hostname>:<port>/obrar.cgi). Since load balancer is listening for https only, this url never reaches anywhere.

There are 2 possible ways to resolve it:

1>      Create a forwarder on load balance that will forward all the http traffic to https on the same load balancer. This solution is not preferred by many organization as they do not want any unsecure port on the internet facing load balancer.

2>    Set the header variable IS_SSL to the value “ssl” on the load balancer. Webgate looks for this attribute to find out if original traffic was in secured mode. If value is set to “ssl”, the resond will include “HTTPS” instead of “HTTP”.


Have fun….